
CI/CD
WHAT IS CI/CD?
- CI:
- Continuous Integration
- The purpose is to allow for code to reside in a central repository and to run in a consistent environment so that anyone can test their new features straight away.
- CD:
- Continuous Delivery
- The purpose is to allow for fast and smooth deployment at anytime
- Continuous Deployment
- Higher degree of automation
- Build & deployment occurs automatically whenever a major change is made to the code
- Continuous Delivery
Buildkite
-
Before we look at a sample pipeline, let’s have an overview look of what Buildkite is.
-
Buildkite is one of the many CI/CD tools that allows you to create a pipeline to build, test and deploy your application. Other popular tools include Jenkins and Travis.
-
MYOB devOps team has developed a program that enables one to create a pipeline on Buildkite by running just one simple command. Otherwise, if you want to set this up manually, you can follow the tutorial on Buildkite
- This tutorial runs through how to set up and install a buildkite agent on your machine, create a sample pipeline and then create a build.
- This post does not explain how buildkite works.
What is the difference between a Pipeline and a Build
- From my understand, a pipeline refers to the process of automating the building of an artifact, testing it and then deploying it. A simple git push will trigger this chain of actions to happen.
- A build is the specification of how this process should occur step by step.
- Within your github repo, there should be a build file called buildkite.yml that specifies the build, test and deploy steps for the buildkite agent to run.
WHAT DOES A TYPICAL CI/CD PIPELINE LOOK LIKE?
The example application I’m building a pipeline for is a simple HttpServer Java application.
Below is a diagram of a possible pipeline to build, test and deploy the application. There are many ways one can construct this pipeline.
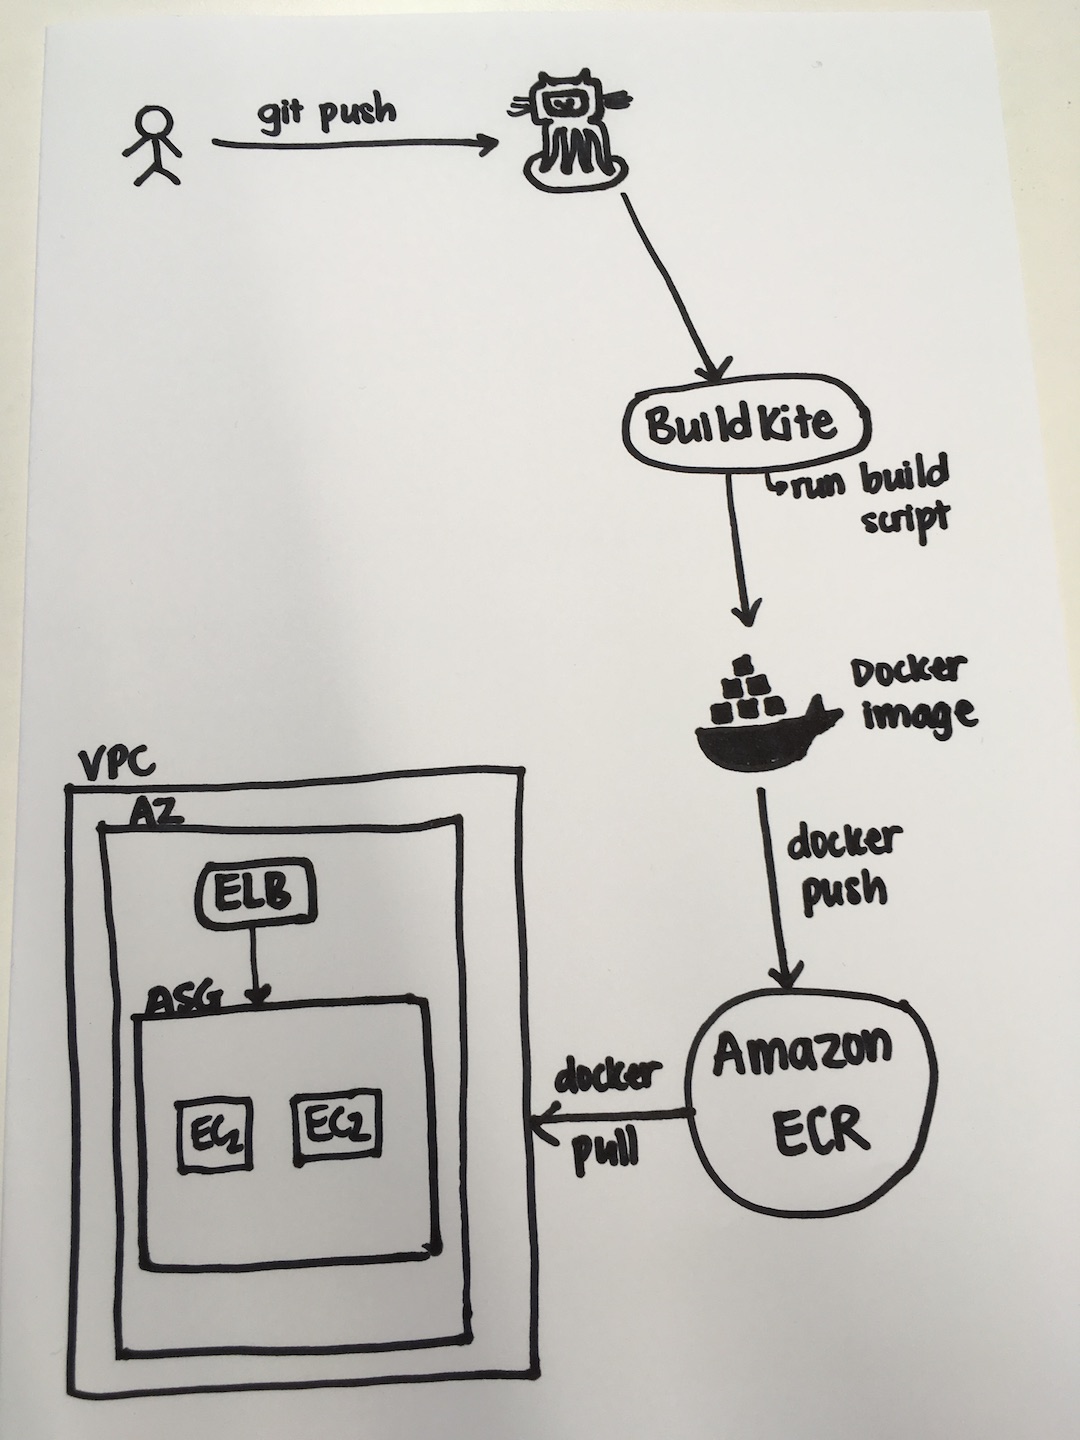
The steps I went through to create this pipeline are as followed:
Step 1: Dockerize the Java application:
Dockerizing the application is a good way to ensure that everyone in a team can run the application in the same environment.
Here is what my Dockerfile look like:
FROM openjdk:8-jdk

COPY . /app
WORKDIR /app

RUN ./gradlew build --stacktrace
RUN ./gradlew jar

EXPOSE 80

CMD ["java", "-jar", "build/libs/server.jar"]
The resulting docker image should result in a jar file being created, as well as all the code in my current project directory (like tests, source code, bin files, etc.)
Step 2: Create a buildkite.yml file to specify the steps for the buildkite agent to run in the pipeline
steps:
  - label: 'Build Docker Image'
    command: 'docker build -t thi-helloworld-httpserver:latest .'
    agents:
      queue: 'fma-dev-dflt'

  - wait

  - label: 'Run Tests'
    command: 'docker run thi-helloworld-httpserver:latest ./gradlew test'
    agents:
      queue: 'fma-dev-dflt'

  - wait

  - label: 'Push Docker Image To ECR'
    command: './bin/my_push_ecr.sh'
    agents:
      queue: 'fma-dev-dflt'

  - wait

  - label: 'Create new EC2 instance with new Docker image'
    command: './bin/deploy.sh'
    agents:
      queue: 'fma-dev-dflt'
As you can see, within this pipeline I want to build the docker image first, so that I can run all the tests that the application needs to pass in order to be deployed.
The wait command is to tell buildkite to run those steps synchronously. Without them, buildkite will run all commands at the same time.
Once all the tests pass, I know that this docker image is a stable version and so I push it to a Docker repository called ECR (Elastic Container Registry). This is a service provided by Amazon. There are other equivalent options out there, one of them is DockerHub. Here is the script to push the docker image to ECR.
#!/usr/bin/env bash

# image params
image_tag="latest"
image_name="thi-helloworld-httpserver"

# acc params
region="ap-southeast-2"
account="945367126992.dkr.ecr.$region.amazonaws.com"

# image + uri
image="$image_name:$image_tag"
uri="$account/$image"

# auth to be able to pull images for an aws account.
eval "$(aws ecr get-login --no-include-email --region $region)" 2>/dev/null

# tag and push image to ECR.
docker tag "$image" "$uri"
docker push "$uri"
Once the new Docker image is pushed to ECR, I then run a script to deploy a new EC2 instance that runs the new Docker image.
#!/usr/bin/env bash

# AutoScalingGroup
asg="ThiHttpServerAutoScalingGroup"

# Set aws region
aws configure set region ap-southeast-2

# Scale ASG to have 2 instances
aws autoscaling update-auto-scaling-group --auto-scaling-group-name $asg --min-size 2 --max-size 2 --desired-capacity 2

# Check that both instances are Healthy and In Service before proceeding
# Does that mean that one will be running the old instance? How does the load balancer know which one to point at?
function get_inService_instance_count {
	inService_count="$(aws autoscaling describe-auto-scaling-groups --auto-scaling-group-names $asg --query "AutoScalingGroups[0].Instances[*].[HealthStatus, LifecycleState]" --output text | grep -c "InService")"
	healthy_count="$(aws autoscaling describe-auto-scaling-groups --auto-scaling-group-names $asg --query "AutoScalingGroups[0].Instances[*].[HealthStatus, LifecycleState]" --output text | grep -c "Healthy")"
}

get_inService_instance_count

while [ $inService_count -ne 2 ] && [ $healthy_count -ne 2 ]
do
get_inService_instance_count
done

echo "New instance created and in service"

# Scale ASG down to have 1 instance (ASG will kill old instance)
aws autoscaling update-auto-scaling-group --auto-scaling-group-name $asg --min-size 1 --max-size 2 --desired-capacity 1

get_inService_instance_count

while [ $inService_count -ne 1 ] && [ $healthy_count -ne 1 ]
do
get_inService_instance_count
done

echo "Old instance terminated"
My bash script is a bit messy at the moment. I’m thinking of writing python script for deployment
Deployment
-
There are many options when it comes to how to deploy a new version of your application from the new Docker image using Amazong services.
-
Some example options:
-
Scale up your existing Amazon Auto Scaling Group (ASG) to have one or more new EC2 instances that run the new Docker image. Once the new instances are up and running, scale down the Auto Scaling Group to kill old EC2 instances. This is the approach I used for this example. The problem with this approach is that there is a brief moment in time where your Auto Scaling Group has both the old and new EC2 instances running at the same time.
-
Create a new Auto Scaling Group with new EC2 instances running the new Docker image. Once these instances are up and running, detach the Elastic Load Balancer (ELB) from the old ASG, and attach it to the new ASG. This way, at any one time, you have a stable group of EC2 instances running the same version of the application. It’s also easier to revert back to the old version this way.
-
Another more automatic option is to use Elastic Container Service (ECS) with the Fargate Launch Type which will manage all the infrastructure that you need to run your app for you (clusters, servers, instances, etc.)
- Note: ECS has two launch types: Fargate or EC2 Launch Type. Fargate allows for a lot more automation that a developer who just wants to focus on developing and not having to worry about infrastructure might want. EC2 requires more setting up and interaction with the ECS Container instance, service and cluster.
- An overview of ECS can be found on this post
-